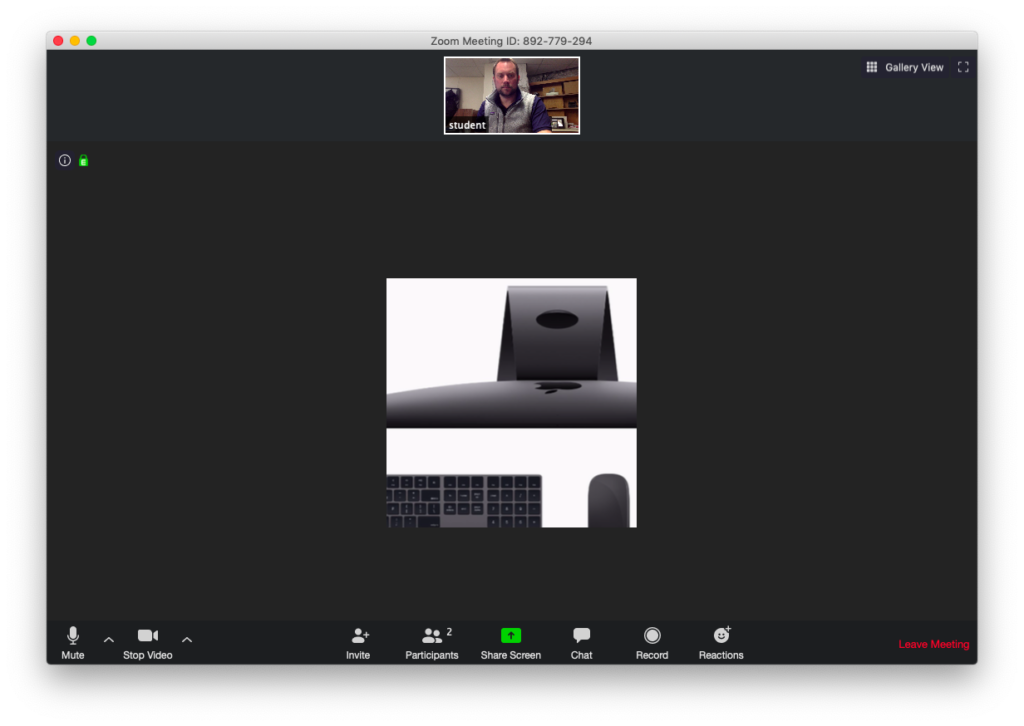
Zoom is a videoconferencing app we are going to be using for live in-person meetings and class sessions, as well as recording mini-lecture videos for uploading to myHebron. Below are the steps for joining a meeting, setting up a meeting and sending out the link for participants (as well as sharing your screen and starting and accessing the recording of the meeting once it is over).
These are just the basic steps however and Zoom has extensive help and training resources which can be found here.
Getting Started
- If you do not currently have a Zoom account go to https://zoom.us/signin, click the Sign in with Google button, login with your school email credentials and then create the account
- To join a meeting simply click on the Zoom link provided. If this is the first time you have used the service an app installer will download and you will need to run this. Follow the installer steps to install the Zoom app. Note that if you are on a Chromebook you will be prompted to install an extension from the Chrome Web Store. Once installed go back and click the link again.
- Click Open zoom.us to run the app the join the meeting
- Enter your name if prompted and also allow Zoom to access to your microphone and webcam
- Click Join With Computer Audio and you are then in the meeting
- Here is what your screen will look like with all the different controls at the bottom. If the controls autohide just move your mouse to make them reappear.

7. There are a couple of different tools you can access once the meeting has begun including a live chat, and a list of all the participants. Click on the corresponding buttons on the bottom toolbar and different side panels will open up
8. The participants list especially has some useful tools when you are part of a meeting with multiple people, including mute tools and the ability to “raise your hand” if you have a question or comment. For this option simply click the Raid Hand button found at the bottom of the window. A blue hand symbol will appear on your name and your video image. Click Lower Hand to remove the symbol once you have asked your question.
Hosting a Meeting
- Once you have an account and have downloaded and installed the Zoom app, to host a meeting simply go to the Zoom sign in page and sign in with Google
- Then click Host a Meeting: With Video On found in the top right hand corner of the browser window
- Click Open zoom.us to run the app and start the meeting
- Next click the Invite+ button in the bottom toolbar
- From this invite window you can either:
- click the Copy URL text to have the basic meeting link copied to the clipboard. You can then paste this into a myHebron message
- click the big Gmail button to generate a new email message with all the details of the meeting
- Once the participants have joined the meeting hit the Record button in the bottom toolbar. The recording video will be saved when you finish the meeting and can be uploaded to Google Drive or myHebron just like any other file
- When you have completed the meeting click the End Meeting text in the bottom right hand corner of the screen and then click End Meeting for All.
- A file conversion window will then pop-up. Once the file conversion is complete click the drop down under Save my recordings at, click Choose a new location and then save the video and audio files to somewhere like your desktop for easy access. Finally click Save and in the created folder the .mp4 file is the video recording.
You can also schedule meetings ahead of time and full instructions for this can be found here.
Using Zoom to Record Mini-Lectures
We are also going to be using Zoom to record mini-lecture videos for posting on myHebron. This is just a meeting with yourself and no participants that is recorded to video. Simply follow the steps above to start a meeting, record the meeting, end a meeting and save the recording without inviting anybody.
One tool that you may find useful is the ability to share you screen, so that you can go through class resources like a slideshow or show a website:
- One you have started the meeting and started to record it click on the green Share Screen button in the bottom toolbar, select Desktop 1 and then click Share
- The app will now record both your webcam and everything you do on the screen
- Once you are finished with your lecture click the red Stop Share button at the top of the screen, and then end the meeting and save the recording video as normal
