Flipped Classroom Workflows

According to Wikipedia: “Flipped classroom is an instructional strategy and a type of blended learning that reverses the traditional educational arrangement by delivering instructional content, often online, outside of the classroom and moves activities, including those that may have traditionally been considered homework, into the classroom. In a flipped classroom model, students watch online lectures, collaborate in online discussions, or carry out research at home and engage in concepts in the classroom with the guidance of the instructor”.

We have helped a number of teachers setup workflows for recording flipped classroom videos and our recommendations to make this process as simple as possible are detailed below.

Recording Yourself

PhotoboothLOGOThe quickest and easiest way to create a flipped classroom video for your students to watch outside the classroom is to record yourself in-front of your whiteboard. Simply setup your MacBook or iPad to record, deliver your class or lecture, trim the start and end of your video and then upload and share this video through Google Drive. You can find further help on audio and video recording here, and iPad specific instructions here.

Blendspace

One tool we recommend to package together videos (either recorded by you or existing content from video sites like YouTube), documents, links and other resources into an online lesson is Blendspace. Each of the resources you choose for your online lesson can be embedded into a grid and the students then go through each resource in order. So you could add some content overview text first, then perhaps some technical drawings, then a video and finally some review questions.

Here is an example of what a student might see after you have created a lesson, with each box in the grid linking to a different resource:

Screen Shot 2015-05-20 at 9.30.32 AM

And here is a good overview of the service:

https://www.youtube.com/watch?v=aQ_Mg3lSoew

Using Explain Everything

Explain Everything is a multi-purpose app available to all faculty on their iPads and one feature is that the app can record your actions when creating any kind of project and then export those actions as a video (again to be shared through Google Drive). So you can create presentation slides, annotate PDFs and record your voice all within the same project and then turn that into a video. Further information on Explain Everything can be found here, with section 4 focusing more on creating flipped classroom recordings.

EDpuzzle

Another online tool we recommend is EDpuzzle, which lets you add interactivity to videos you have made or existing video content from sites like YouTube. You can import or upload a video and then use EDpuzzle’s editing features to crop, add text and audio notes as well as questions and quizzes at specific times within the video.

You can see an example of what can be created here and below is a good tutorial taking you through the different parts of EDpuzzle:

https://www.youtube.com/watch?v=8377YLHrdwU

Posted in Professional Development | Comments Off on Flipped Classroom Workflows

Grade 6/7 French – Radio Shows in GarageBand

Following up from this project during French Flex, grade 6/7 students worked with a partner to record themselves in GarageBand reading their storybooks. They then edited these recordings together into one track, added a brief welcome introduction, sounds effects and a jingle, and finally adjusted the volume levels, to create a finished radio show completely in French.

Their finished tracks are embedded below as a SoundCloud playlist:

Posted in Tech in the Classroom | Comments Off on Grade 6/7 French – Radio Shows in GarageBand

Grade 7 English – Storyboarding & Green Screen

Grade 7 English students have been studying a student version of The Odyssey, and their final project was to choose a story from the book and then film themselves acting out the story.

The first step in creating their re-telling of the classic tales was to storyboard their ideas into a workable series of scenes. To create these we used Storyboard That, an excellent online tool with lots of characters, designs and text options. The finished storyboards are embedded below:

Screen Shot 2015-05-05 at 2.56.49 PM

Screen Shot 2015-05-05 at 2.56.59 PM

The students then setup and filmed all of their scenes in front of neon green paper, which could then be replaced by any image in iMovie later on. Here are a few pictures of the students filming their scenes:

The final step was to select the background images they wanted to use for each scene, import these into iMovie and combine them with the clips they had already recorded. They also needed to add titles and credits. The completed movies are embedded below:

Posted in Tech in the Classroom | Comments Off on Grade 7 English – Storyboarding & Green Screen

Websites and Blogs

If you would like to create a website or blog, either as a separate class project or more as a way for students to create an online portfolio, there are a number of options available:

WordPress

As part of myHebron, the technology department can create and host blogs at sandbox.schoolpress.co. This is how this blog is setup, as well as a few other department and class blogs currently in use.

The software provided is called WordPress and is a professional blogging platform that allows us to specify blog admins (who can change the design of the blog and edit any submitted content) as well as give access to specific students as authors (to create posts and comment on other posts).

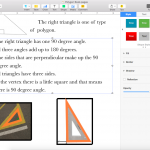
Here is what the backend looks like when adding a new post, with the different sections accessed on the left hand side and a box for the post title and another for the content on the right:

Screen_Shot_2015-05-15_at_9_28_22_AM

It is also very easy to embed a whole range of different content into your post, including picture galleries and YouTube videos. For a classroom example take a look at this post on the AP Literature and Composition class blog that was setup this year.

To set up a blog for you through this service, we just need to know the name you would like for the blog and list of the students you would like to be able to post content.

Blogger

Another blogging option we recommend, if you do not want to make your blog a part of myHebron, or if you want each student to create their own individual blog and choose the design themselves, is Blogger. This is a blogging platform provided as part of your and every students’ Google Apps account.

The layout, structure and options are very similar in style to WordPress, the only real difference is that you or your students would have to setup everything from scratch. If this is something you are interested in doing, here is an excellent guide to getting started.

Google Sites

Everyone will be familiar with Google Sites as this is what has been used to create your old PDPs (before we switched to Folio), but this is also a tool that can be used in the classroom to quickly create and publish a website. Again, this is a service provided as part of your and every students’ Google Apps account. Although the interface for editing and designing layouts can be a little clunky, Google Sites is especially good at embedding Google Drive content, such as Google Docs and Slides, which makes it very easy to create portfolio websites of academic work.

For an example project completed this year check out this post on Epic Poems, including links to the finished student websites.
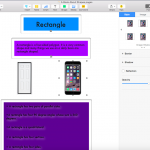
iWeb

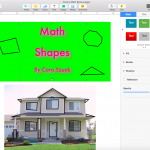
Another option if you are looking to spend more time on the design and layout of a website is iWeb. This is a desktop app that is available on the library iMacs and is similar in style to something like Pages. This app lets you select from a range of templates and then exactly position objects such as text boxes and images, as well as add a range of text and image effects such as shadows and reflections. You can also embed different content such a YouTube videos and other multimedia content.

Here is what the interface looks like, with the inspector options in the box to the right:

Screen Shot 2015-05-15 at 9.48.32 AM

The only downside to iWeb is that the files are stored locally on the computer so can’t be accessed from anywhere through the web (which is the case for the services listed above). Also, the finished project, once submitted, is a static site. This means that any changes made result in the whole site having to be re-uploaded.

Here is an example project from this year, again with links to student work.

Posted in Professional Development | Comments Off on Websites and Blogs

Grade 6/7 French – Children’s Storybooks

Grade 6/7 students have been learning French vocabulary for different animals, items of clothing and colors. Based around these sets of words they each created a children’s storybook in which an animal visits a famous place and then puts on ten different colored items of clothing. They then came up with a punchline for their story, as well as an eye-catching book cover.

The book was designed using PowerPoint, making use of the software’s simple drawing and shapes options as well as the Remove Background tool. The students spent a lot of time creating layouts and choosing fonts that would appeal to a younger audience.

Their completed books are embedded below:

Posted in Tech in the Classroom | Comments Off on Grade 6/7 French – Children’s Storybooks

Grade 6/7 – Digital Landscapes

For the past few weeks the grade 6/7 art class has been working on a digital landscape art project using the desktop version of Sketchbook. This is a great app that tries to mirror paint and paint brush effects in software, allowing students to create watercolor and smudge effects with strokes on the trackpad.

The students started off by sketching an example landscape using pencil and paper, then after experimenting with the different brushes and effects in Sketchbook, attempted to recreate the same landscape in Sketchbook using their own interpretation of the image.

Next, they had to select their own landscape image and recreate that building on the skills and techniques they had learned from drawing the previous image. The final reflective step was to create a gallery-style poster in Pages complete with their final image and an artist statement describing their work.

Here is a selection of their finished landscapes and some of the gallery posters they created:

And here are a few photos of the class hard at work sketching and then working in Sketchbook:

Posted in Tech in the Classroom | Comments Off on Grade 6/7 – Digital Landscapes

Grade 7 Math – Surveys & Data Analysis

Grade 7 Math students spent the past two weeks working on a survey project, with each student picking a topic of interest, creating a survey based around this topic, collecting data from the school community and then analyzing and reporting their results.

They worked through the following steps, using a range of different apps in the process:

  1. Define research question (Google Docs)
  2. Create survey (Google Forms)
  3. Distribute survey (Gmail)
  4. Data collection (Google Sheets)
  5. Data manipulation (Excel)
  6. Data analysis (Excel)
  7. Report findings (Pages, Preview)

Creating Google Forms and working with data in a spreadsheet were brand new skills for the students, which we took even further by creating custom templates when designing the surveys and manipulating data using calculations and formula, as well as creating several different types of graph.

Their finished reports are embedded below:

Posted in Tech in the Classroom | Comments Off on Grade 7 Math – Surveys & Data Analysis

MacBook Audio & Video Basics

Working with both audio and video in the classroom is a great way to integrate technology. You can use it to simply record student presentations and performances, either for practice or self and peer evaluation, or create a multimedia project such a podcast, tv commercial, radio show or movie trailer. There are a number of ways to use both audio and video on your MacBooks.

Audio

The easiest way to record audio on your MacBook is to use the QuickTime Player app. Just open the app, click File: New Audio Recording from the drop down menus at the top of the screen:

Screen_Shot_2015-05-06_at_1_35_36_PM

Then once you are ready hit the red record button. Click stop once you are done and then click the red x to close and save your audio file.

Another option on the Mac is Audacity, a free open source recorder and editor. Once you have downloaded and installed the app, again you just need to hit the red record button to start (and the stop button to stop):

Screen_Shot_2015-05-06_at_1_44_35_PM

You should now be able to see the wave form of your recording in the main section of the app and you can now edit it. Click and drag anywhere on the recording and press the delete key to remove that section:

Screen_Shot_2015-05-06_at_1_44_53_PM

One other nice feature of Audacity is the range of different effects and plugins it offers, including amplify which boosts the audio if the recording ends up being too quiet. These can be found in the Effect dropdown menu:

Screen_Shot_2015-05-06_at_1_45_01_PM

You can also save, export, etc. your file in a number of different ways in Audacity but to be able to save a file as an mp3 you do need to download an additional file called Lamelib, which you can get from here.

Finally, if you want to do a more elaborate audio project the best option is GarageBand, which is installed on your MacBook Air as well as on the iMacs in the Library. GarageBand lets you record and edit in a similar way to Audacity but also lets you build up recordings using separate tracks, including prerecorded audio loops.

This lets you produce radio shows or podcasts for which students record and edit the audio sections and can then add jingles and sound effects. Here is a good tutorial on how to do this in the newest version of GarageBand:

Video

To quickly record video on your MacBooks there are two options we recommend: QuickTime Player, which is as simple as loading the app, clicking File: New Video Recording and the clicking the record button; and Photo Booth. In Photo Booth you just need to load the app, change the mode to video in the bottom left hand corner and then click the record button:

Screen_Shot_2015-05-07_at_9_50_04_AM

Photo Booth stores the videos you take in a timeline along the bottom of the app. If you need to share the file or want to save it some where else you just need to drag the video out of the app. Photo Booth also works will if you just want to take photos with your MacBook – just change the mode back to photo.

Your MacBooks, and the iMacs in the library, have the desktop version of iMovie installed, which is an excellent app for creating professionally edited movies, with titles, transitions and voice over. There are actually two versions of iMovie available at the moment, depending on the age of the computer you are working on. The order version of iMovie has a brown star icon and this tutorial gives a nice overview of the basic features:

The newer version of iMovie has a purple icon and is quite a bit different from the version above. Apple have tried to make it more like the iPad version of iMovie with a proper timeline along the bottom for your projects and have removed some of the functionality and options. Here is a good overview of what this new version can do:

Posted in Professional Development | Comments Off on MacBook Audio & Video Basics

Presentation Apps

There are a number of choices on your MacBooks and iPads (and the library for student projects) for creating presentations.

20111. PowerPoint. This is installed on all faculty MacBooks and there is now a free app for all iOS devices (although you will need to sign up for a free Microsoft account to access documents you save in the cloud). PowerPoint on the Mac has been improved a lot over the years and now has a lot more theme and design options.

One important option for creating your own slide designs is the slide master. Click Themes and then click Edit Master:

Screen_Shot_2015-04-30_at_1_35_22_PM

Any changes you make to the design of the slide master are made to all of the slides in your presentation.

2. keynoteKeynote. This is Apple’s version of PowerPoint, is installed on all faculty MacBooks and can be downloaded for free onto your iPad. The basic functionality is the same as PowerPoint but with a range of different themes and fonts designed specifically for the app.

3. Google Slides is a great way to create and share simple presentations, and is excellent for collaborative work. It does not include all the transition and animation effects from PowerPoint and Keynote but there are still a range of limited design options underneath these four buttons:

Screen_Shot_2015-04-30_at_2_05_36_PM

4. There are also a couple of online options that we recommend. These are all cloud-based and can add a nice variation to the standard slide-based presentation:

Prezi, which adds motion and zooming effects to a presentation. You will need to sign-up for an an education account to get free access to this service. There is also an iPad app available on the Self Service.

Here is an example video of what can be accomplished in Prezi:

https://www.youtube.com/watch?v=ArGh6FurR0Q

PowToon Slides, which provides animation and more cartoon-based themes to play with. Again, you will need to sign-up for an account to create your own presentations.

Here is a good tutorial showing some of the different features:

https://www.youtube.com/watch?v=4upSmZMMoL0

Haiku Deck, available both on the web and as an iPad app. Haiku Deck is a great app for creating minimalist presentations – most of the design options have been stripped out, with only a few font and layout options, with the focus being on choosing great images for your slides.

Here is a good review of the app and what kind of presentations it can create:

https://www.youtube.com/watch?v=S2cxFVixxxE

Posted in Professional Development | Comments Off on Presentation Apps

ESL World Literature & World History – Propaganda Posters

Language has power. It is how information and ideas are shared. Hebron Academy students in the Advanced ESL World Literature and Advanced ESL Modern World History classes grasped just how powerful language can be as they studied the causes and effects of the Cold War and the foreboding dystopia of George Orwell’s 1984. They expanded and refined their own English language skills by completing in-depth research into the many facets of power, language, political ideas, and strategies for control. The students then synthesized their findings and conclusions in one of the most powerful language tools used today: propaganda.

Using the graphic program Comic Life, these students created propaganda posters to reinforce their own thesis statements and to complement their oral presentations. Students combined their knowledge of history and language with what they learned about slogans, images, and other graphic elements such as colors, type fonts, and positioning. They applied these skills to the idea of purpose, format, and audience to amplify their own messages.

Ms. Darby, ESL Director

Posted in Tech in the Classroom | Comments Off on ESL World Literature & World History – Propaganda Posters